Pages

Sunday, 28 October 2012

Adding damping material to speakers and blisters to my hands

Sunday means time to work. I started working on the damping material issue. Starting with marking all panels so I knew where to put the material and where to not put anything.
Then I started cutting everything to pieces with a pair of scissors. I fetched the hot glue gun from the workshop and decided to work in my room instead because I had carried all the stuff to my room and it was fairly cold in the workshop.
A big mess in my room. Nice to have a big mat so I don't have to be afraid of damaging the panels because of some tiny gravel or something on the floor.
My hot glue gun. An el-cheapo version but it does the job.
Everything done, although I'm lacking a tiny piece for the last top panel. I've decided to not put anything on the back panels because it would obstruct the ports I think. Might put a tiny bit next to the brace, I'll see.
So what remains is finishing the last top panel and then glue the blue stuff seen to the left in the last picture to the brace. But first I need to buy more glue, I used all of the few sticks I had. Hopefully I wont burn myself on the gun as many times next time and avoid getting hot glue on my fingers because it hurts quite much.

Another thing I've noticed is the weight. The birchply cabinets will be a lot heavier than the particle board ones. Probably two or three times heavier.

Wednesday, 24 October 2012

Finishing the side panels and finding a problem

Today I decided to finish the side panels. It was easy and it took me less than half an hour to finish the remaining two panels.

When I was finished I tried dry-fitting the speakers and then I found a problem. The brace appeared to be too long, or the inner sides on the side panels were too far in. I measured the side panels and there was 21mm from the end of the inner side to the back wall and that's all correct. The brace was not too long because the baffle was aligned well with the bottom panel. I can't leave a 2-3mm gap between the baffle and the side panels so the only option was to sand the baffle down by a couple of millimeters. Took me maybe half an hour to get it right but now the baffle and side panels fit well with eachother. One problem that might occur is that the magnet of the driver will hit the brace too early. Then I will have to sand the brace at the driver cutout. I will do check that the next time I'm in the mood for building (read: when I have time). That would mean removing a driver from my current speaker and fitting it in the birchply cabinets. Hopefully I'll be able to put the driver back in my particle board cabinets, otherwise I'll be without speakers for a while.

I also talked to Olskogen Trävittra today (mentioned them in another post) and they said they could do the 45 degree cuts for me. Isn't that wonderful?

What remains to be done is:

  1. Make sure the drivers doesn't hit the brace too early. If they do, sand it down a bit until it fits.
  2. Drill holes for the drivers in the baffles. Four holes per baffle.
  3. Fit dampening material on the bottom, back, sides, top and baffles. Draw lines on the panels to know where I can fit the material without hitting any other panels.
  4. Mount side panels to the rest of the cabinet
  5. Make sure the terminal fits in the hole and if it doesn't, sand it a bit so it fits and then mount it.
  6. Prepare wires from the terminal to the driver. I think I'll use one or two strands of CAT5 networking cable.
  7. Fit the baffle to the rest of the box.
  8. Again make sure the driver fits well and that it's not hitting the brace and find out how many spacers I need between driver and brace.
  9. Mount the top panel. Hopefully all other panels are of the same height otherwise I'd need to sand them down and that can be a pain in the arse to get them all even. But since they're CNC-cut they should be fine.
  10. Call Olskogen Trävittra and visit them to get the 45 degree cuts done.
  11. Solder the cables to the drivers and mount them and be careful not to slip with the screwdriver.
  12. Plug and play!

I got another package today that contained some pornography :D

Today I got the package from Ingvar containing tweeters, woofers, solder, wires for the tweeters and blade connectors for all drivers. I'm really excited to start building these but I have to finish the dMar-Kel70T first.

This it was it looked like when I opened the box containing the woofers. Really sexy indeed!

The voicecoil is 3" (really big) and sits on the outside instead of the inside making it fully visible. This allows for better cooling of the VC and therefore the driver can take up to 1000 watts (10ms)

The tweeter. Doesn't look special in any way, as far as I know. What struck me though was how light it was was.


Monday, 22 October 2012

5000 pageviews!

Seems like my blog just passed 5000 pageviews. Keep it going and please comment :)

By the way, I was supposed to continue building on my speakers today but I forgot it and went photographing instead. This is what the sunset looked like (took me a while to find out how to get the picture right so by then half of the magic was gone).


Click to enlarge the picture


Sunday, 21 October 2012

Another day working with the dMar-Kel70T

Today the goal was to join the brace, back and bottom pieces together and make holes for the terminals. I am glad to say I actually achieved that and a little more. I'll skip the smalltalk and go directly to the pictures and comment them instead. As they say, one picture can say more than a thousand words. Click the pictures to make them a bit bigger.

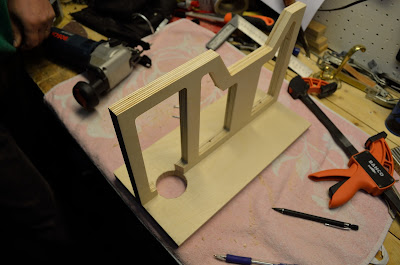
Here I have cut holes for the terminals in the back panel and in the brace and joined these two panels together. The hole for the terminal was 53mm and I had no hole saw of that size so it had to be done manually with a jigsaw.

Back, bottom and brace joined together.

Both done.

When I glued the port spacers onto to the outsides I kept a millimeter or two on the other side towards the back panel to make sure it didn't poke out and to make sure I had enough of it in the other end for the 45 degree cut. This reulted in the spacers being too long so I couldn't fit the baffle so they had to be cut about 2mm so we did this with a jigsaw. Don't try to make a clean cut in birchply with a jigsaw, you will fail!

The first set of sides being joined together. Note there's only four screws here and clamps in the middle.

This time I decided to use eight screws instead so I could skip the clamps and get a better pressing force on all spacers. I also screwed the screws a lot harder this time.

One finished set of side panels, only two left!

I couldn't resist dry-fitting it using speaker number two as a top panel (the real top panel wasn't in the workshop at the moment). So this is how it will look like when it's all done except the 45 degree cuts in the front.

Done for the day. Much work has been done and two sets of side panels still remain. Then I will start mounting terminals, wire, damping materials, top panel and eventually get ready for the 45 degree cut.
As for the 45 degree cut I realise that I wont be able to do that at hope, I simply lack the tools to make a nice clean cut. I will contact a company called Olskogen Trävittra which is close to where I live. Dad knows the owner so hopefully he'll help me out with this. He ought to have the tools and experience needed, since he's building furniture, skis and guitars. Tomorrow I'll finish the side panels (if I have time) and me and dad will continue building on wednesday if everything goes as planned.

Sunday, 14 October 2012

Finishing the sides for the dMar-Kel70T

So today I finished glueing the port spacers to the outer side panels of the dMar-Kel70T. I'll see if I will mount the back, bottom and brace later this week. The reason why I'm not working faster is because I have a limited amount of clamps and my working space is incredibly small.

Saturday, 13 October 2012

Glueing port spacers for the dMar-Kel70T and making some discoveries

I started this morning by dry-fitting a cabinet. It took me a while to figure out all the parts but eventually I made it. I kept the baffle off until the last, and then realised that the baffle was too tall. It is 360mm while the stuff I got from Ingvar was 358mm. This led to some problems... It seemed like I would have to try to sand it  down by 2mm to get it to the right height.

As I was looking at the dry-fitted cabinets I realised something was wrong with the brace, here's a picture to illustrate it.
Click for a larger picture
As you can see the cutout in the brace is too far up, or the hole in the baffle too far down. I didn't know which yet. I looked up the drawings for the T version cabinets comparing them with the ones I had here at home for my standard version cabinets. Both drawings displayed 120mm from top of the baffle to the center of the hole. I measured my baffle that Dave had sent me a while ago and it was more like 140-145mm from the top of the baffle to center of the hole. Good, nothing is wrong with the brace and the baffle has to be redone, which means I'll get it to proper height this time. Ingvar said he would fix it for me and I guess he'll send me the new baffles along with the drivers for the Oy speakers. I am really astonished by how much he cares for his customers. If you're thinking of buying a set of speakers in Sweden, contact Ingvar. I can strongly recommend making business with him!

Another discovery I made just now is that this is the deciSize Mar-Kel70T and that I'm the first person in the world building those. Seems like Dave "tricked" me into beta-building for him again ;) Well, nothing wrong with that. The difference is that this cabinet is ~4l smaller than the standard size Mar-Kel70T. The sonic differences will be that it wont go as low in the bass. But it will sound better than my 12mm particle board cabinet anyways since 18mm birchply is a lot better than 12mm particle board.

When it comes to what I've done today I've been glueing the port spacers onto the outsides of the cabinets. I've finished three of four sides and will do the last one tomorrow. Then I will start thinking of good way of attaching the back panel to the bottom panel. It's very important that I get the angles right at exactly 90 degrees, otherwise the whole cabinet will get weird.

Picture of the workshop where all my DIY speakers have been born. It's a hell of a place to work in and it's impossible to find things when you need them. Click for a larger picture.

Friday, 12 October 2012

The speakers have finally arrived!

Dad came home with the speakers today. Three packages in total. One long, heavy one probably just containing lots of the 18mm birch plywood (I guess all the parts for the Oy). One slightly smaller and much lighter package containing the stuff for the Mar-Kel70T which Ingvar was so nice to cut for free. It also contained filter components, binding posts and panels, some damping material, glue, cables (the cables to the tweeters were missing but Ingvar will send them with the drivers later), screws and some other stuff. The smallest box was very light and it seems like it contains damping material only for the Oy.

Click for a larger picture
Tomorrow I will start building the Mar-Kel70T speakers, hopefully everything goes as planned.
Everything will be documented thoroughly since I'm planning on using some of it for a school work.

Thursday, 11 October 2012

The speakers have arrived! (Almost...)

Ingvar e-mailed me today saying that the speakers had arrived at my dad's job in town. Will be getting them home tomorrow.

I'll start with building the Mar-Kel70T since I have drivers for them, and use them until I get the drivers for the HAD OY (as they're so beautifully named :P)

Tuesday, 9 October 2012

The waiting for delivery is finally coming to an end soon

I got a message from Ingvar yesterday. He told me that Morel had lost the other driver shipment too so it will take another while until I can get my drivers. But he said that he could send me all the other stuff so I could start assembling the cabinets and have that done when the drivers arrive. That's a very good idea and he'd pay the extra shipping costs that would lead to.

This morning I started thinking of assembling the Mar-Kel70T that Ingvar has cut panels for. The issue of damping material came up in my head. I have CSS Ultratouch in my current cabinets that could be salvaged but that's not the best and easiest way of doing it. So before heading to school this morning I sent an email to Ingvar and asked him if it was OK if I bought some extra damping material for the Mar-Kel70T. He said that it was OK since he didn't have time to ship the stuff yesterday and would do it tomorrow instead and he also said he would give it to me for free since it was so little. He's a nice guy!

So hopefully I'll have the stuff on friday, else I'll have them at my dad's job on monday and here at home on tuesday evening.

Another day working with the IR remote

Me and my friend Robin continued working on the remote control idea today. Unfortunately no pictures were taken since I'm still running a Jelly Bean ROM on my phone so the camera still doesn't work.

We started with making sure the ON/OFF function was functioning properly and it did. It appears we had connected the LED wrong last week.

Then we started experimenting with a stepping motor. Turning a potentiometer with a servo isn't a very good idea, but using a stepping motor is really cool. A stepping motor needs four transistors. Finding the right NPN-transistors proved to be somewhat of a challenge but after some searching we found some. We didn't have time for much more than connecting everything to the Arduino board and trying some different codes from the library to make it move. It did move, but we aren't sure yet if the coils are connected properly since we have no idea which are which. We will have to find that out next week.

During the evening I also tried soldering surface mounted components with a hot air gun. It was pretty simple actually. Starting with applying some kind of liquid solder to the pads with a little "pistol". Then place all the tiny components as they are supposed to sit. Then it was a simple as to just take the hot air gun and hold it over the components for a couple of seconds and you could see the solder melting, soldering the components to the board. Afterwards I measured all the joints with a DMM and only one out of ~25 had to be resoldered, which I'd say is good since it was my first try at it. This had nothing to do with the remote control though, this is for an alarm/lock system for the building we're using (Kulturbanken 2.0).

Wednesday, 3 October 2012

Speaker cables

Since I'm not allowed to reproduce any of the content I'll just link to the website instead - http://www.roger-russell.com/wire/wire.htm

It's about speaker cables and how many bullshit products there are out there. I totally agree with the author.

Personally I'm using Supra Classic 4.0 speaker cables, but I got them for free when buying an amplifier and they are flexible and nice to use so that's why I'm still using them. I have compared them to some expensive Van Den Hul cables (borrowed from a hifi store) and some CAT5-cable. I didn't hear any difference between any of them, to be honest.

Remote controlled volume control

So yesterday I was at the meeting for the IT-group at the local "Kulturbanken". Me and a couple of friends are in the process of starting a Makerspace in the town we live in and as a first project (has to be project based so we can get sponsors) we chose to develop/construct a remote controlled volume control which i will later use in my stereo system.

When I have finished building my speakers (which hasn't been shipped yet...) I will start finishing my amplifiers (the AMP10-Basic and the AMP15 PS-XP) and then sell my current Harman Kardon HK3490. That will put me without volume control and remote control. Since I don't have the need for a full-scale pre-amplifier I was thinking of just having a simple volume control that can be controlled with a remote control.
I consulted my friend Daniel who has lots of knowledge of electronics and such things and he said that we could try it right here and now.

So we started out with a simple IR remote that my friend Robin had, and then an IR-reciever and an Arduino CPU. We found a simple servo in a box too. We started with making sure the IR-reciever worked, by connecting an LED and made it blink everytime the Arduino got a signal from the IR-reciever. Robin did all the programming while I was looking and thinking of the next step. I could probably have programmed that myself but since he is way better than me at programming I let him do the job (and the computer we were using was running Linux and I have no idea how that works).

The IR-Reciever. Ignore the resistor, we had the LED placed there before but removed it before this picture was taken.
The next step was to find out what "codes" the IR remote control was sending when we pushed the + and - buttons on it. We opened some window called "serial monitor" if I remember correctly and there we could see what codes the buttons had.

The next step was to connect the servo to the Arduino board and get that working properly. We managed to get it moving without the remote control at first. Then we implemented that code to the IR remote control and made it possible to control the servo with the + and - buttons on the remote. It was moving very slowly and you couldn't hold the button down, you had to press again to make it move another one degree.

This is with the servo installed (servo not in the picture though, only the cables). 
The next step was to make it possible to hold the button down and the servo would continue to move in the same direction. The code for the + and - buttons were something like "0xFFA25D" (hexadecimal values) while the code for holding down a button (any button being held down) gave "0xFFFFFFFF". To make it possible for the code to remember which way it is moving (since the code for holding down a button is the same for all buttons) we had to make an integer called "Direction". Robin wrote the code successfully and we manage to get that working as well. The only downside was that the servo we were using still moved pretty slow this way. But that doesn't matter since we most likely wont use a servo in the final product.

Then we started working on an ON/OFF function. In the final product I guess we'll control a relay to turn it on and off but for this experiment we decided to try to turn on and off an LED diode. Unfortunately we ran out of time but we think we know how to do it. Connect the LED to an output on the Arduino board and then control the output and set it to either HIGH or LOW. The code for that is really simple and shouldn't pose any problems.

This is how we tried to connect the LED. Robin found some guide on the Interwebs saying it was possible to do like this.
And on my way home I started thinking about the mute function but that shouldn't be that difficult either. Just put a relay in the signal path and control it with the HIGH/LOW function.

What I imagine the final product to be like is an IR remote control with volume up, volume down, on/off and mute buttons. I will then make a tiny case being the "pre-amplifier" housing a potentiometer to control the volym, a mute switch as described above and then some function to cut the power to the amplifiers.

For guidance we used this page http://www.arcfn.com/2009/08/multi-protocol-infrared-remote-library.html

Tuesday, 2 October 2012

Waiting for delivery...

When I spoke to Ingvar (the guy I have ordered speakers from) last week he said he'd send the stuff on monday this week (that was yesterday). I emailed him today to see if he had sent the stuff and he replied that a delivery of filter components and drivers had gone astray so he had to wait for it to arrive before he could send the stuff to me. So while I'm waiting for the stuff to come I took this beautiful picture from my balcony. The winter is coming :)

Click for a bigger picture